In This Article
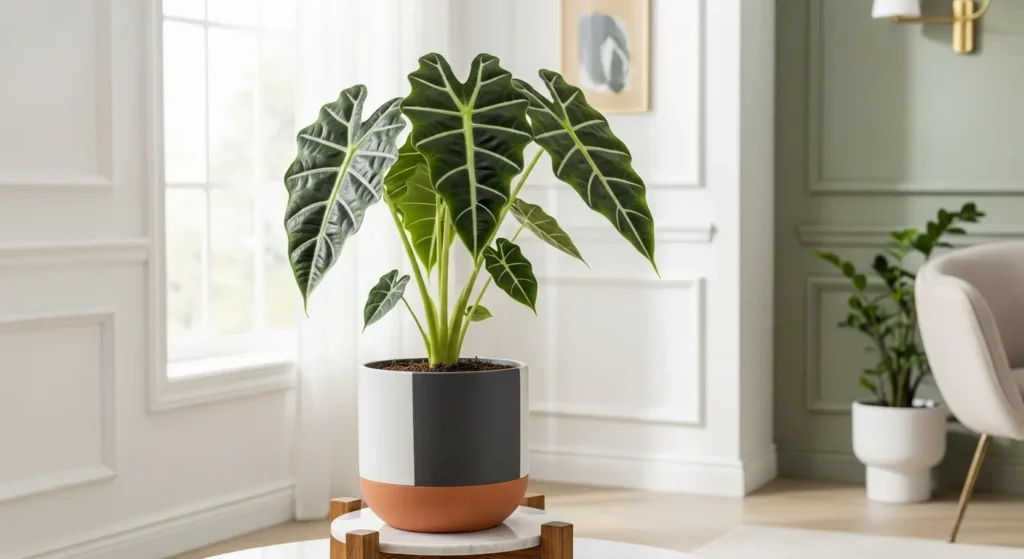
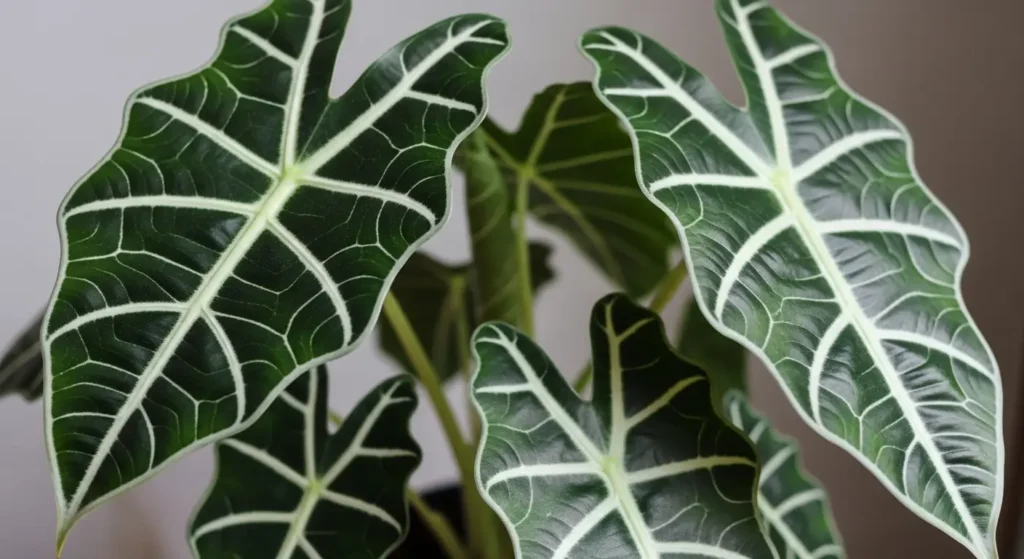
The Alocasia Polly, also known as the African Mask Plant or scientifically as Alocasia amazonica, is one of the most striking houseplants you can add to your collection. Its dramatic, dark green leaves feature bold white veins that create a pattern resembling an intricate mask. Native to the tropical rainforests of Southeast Asia, this stunning plant brings an exotic touch to any indoor space.
While it has a reputation for being a bit particular, this plant is actually quite manageable once you know what it needs. With the right care approach, you’ll be rewarded with lush, impressive foliage that makes a real statement.
Plant Care Card
| Attribute | Details |
|---|---|
| Common Name | Alocasia Polly, African Mask Plant |
| Botanical Name | Alocasia amazonica (syn. Alocasia x amazonica) |
| Family | Araceae |
| Plant Type | Tropical perennial |
| Mature Size | 1-2 feet tall, 1-1.5 feet wide |
| Sun Exposure | Bright indirect light |
| Soil Type | Well-draining, rich, loose potting mix |
| Soil pH | 5.5-6.5 (slightly acidic) |
| Hardiness Zones | 10-11 (USDA) |
| Native Area | Southeast Asia (hybrid cultivar) |
| Toxicity | Toxic to pets and humans |
Alocasia Polly Care
Alocasia polly is a moderately demanding plant that rewards attentive care with stunning foliage. Here’s everything you need to know about light, water, soil, and more to keep it thriving. With just a little attention, you’ll have a healthy, happy plant year-round.
Light
These plants absolutely love bright indirect light think of a spot near an east or north-facing window. Direct sunlight will scorch those beautiful leaves, leaving you with unsightly brown patches. On the other hand, too little light causes leggy growth and smaller leaves.
If you notice your alocasia polly leaning toward the light source, rotate it every few weeks. A sheer curtain works perfectly if your only option is a sunny window.
Soil
Well-draining soil is non-negotiable for this tropical beauty. Your alocasia polly needs a mix that retains some moisture but doesn’t stay waterlogged. According to Penn State Extension, peat-based soilless mixes combined with perlite or vermiculite provide excellent drainage and aeration. A standard potting mix enriched with perlite or orchid bark works wonderfully.
For a DIY approach, try mixing 2 parts peat-based potting soil, 1 part perlite, and 1 part orchid bark. This combination gives excellent drainage while maintaining the moisture these plants crave.
Water
Watering can be tricky, but here’s the sweet spot: keep the soil consistently moist but never soggy. Check the top 2-3 inches of soil if it feels dry, it’s time to water. During spring and summer, you might water weekly or even twice a week.
Overwatering leads to yellow leaves and root rot, which can kill your plant quickly. Underwatering causes drooping leaves and brown, crispy edges. In fall and winter, reduce watering frequency as growth slows down. Room temperature water works best, as cold water can shock the roots.
Temperature and Humidity
This tropical plant thrives in warmth and humidity ideally between 65-80°F. Keep it away from cold drafts, air conditioning vents, and heating registers. Temperatures below 60°F will stress your plant and may cause leaf drop.
Humidity is where this plant gets particular it prefers 60% or higher. Most homes sit around 30-40%, so you’ll likely need to boost humidity. According to University of Maryland Extension, most indoor plants benefit from treatments to raise humidity in their vicinity. Use a humidifier nearby, place the pot on a pebble tray with water, or group it with other tropical plants. Many humidity-loving houseplants like Philodendron Melanochrysum thrive in similar conditions.
Fertilizer
Feed your alocasia polly with a balanced liquid fertilizer diluted to half strength every 2-4 weeks during spring and summer. Skip fertilizing in fall and winter when the plant enters dormancy. Too much fertilizer causes salt buildup and burnt leaf tips.
Propagating Alocasia Polly
The best time to propagate is during spring and summer when the plant is actively growing. Additionally, propagation gives you more plants to enjoy or share with friends. If you’re interested in other Alocasia varieties, check out Alocasia Frydek and Alocasia Stingray for similar care requirements.
Propagating by Division
Division is the most successful method for alocasia polly and produces mature plants faster than other techniques.
Materials needed:
- Sharp, sterilized knife or pruning shears
- Fresh potting mix
- Pots with drainage holes
- Gloves (plant sap can irritate skin)
Step 1: Remove the plant from its pot and gently shake off excess soil to expose the root system and rhizomes.
Step 2: Identify natural divisions where the plant has produced offset rhizomes with their own root systems and at least 2-3 leaves.
Step 3: Using your sterilized knife, carefully cut between the rhizomes, making sure each division has healthy roots attached.
Step 4: Plant each division in its own pot with fresh, well-draining soil, water thoroughly, and place in bright indirect light.
New growth should appear within 4-6 weeks if conditions are right. However, don’t panic if your divisions take longer—some can be slow starters.
Propagating by Rhizome Cuttings
This method works when you spot small rhizome offsets without extensive root systems.
Step 1: Locate a small rhizome offset and cut it from the parent plant with a clean knife.
Step 2: Plant the rhizome horizontally in moist potting mix, covering it with about 1 inch of soil.
Step 3: Keep the soil consistently moist and maintain high humidity by covering with a clear plastic bag.
Roots and shoots typically develop within 3-4 weeks, though patience is key with this method.
Potting and Repotting Alocasia Polly
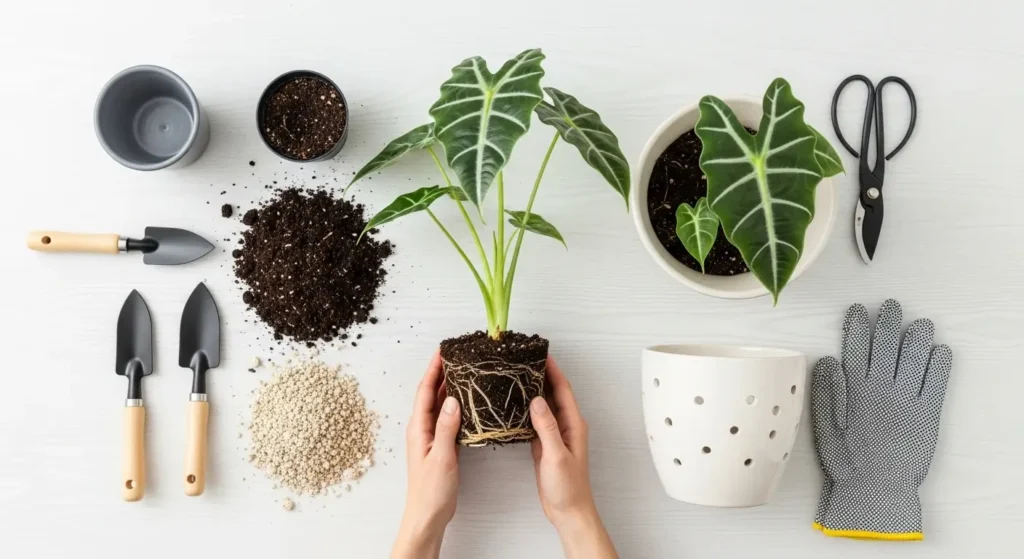
Your alocasia polly needs repotting every 1-2 years or when roots start emerging from drainage holes. Spring is the ideal time to repot, coinciding with the plant’s active growth period.
Choose a pot only 1-2 inches larger than the current one too much space leads to overwatering problems. Make sure your new pot has drainage holes, which are absolutely critical for preventing root rot. Fresh potting mix gives your plant renewed nutrients and better structure.
When repotting, gently loosen the root ball and remove any dead or mushy roots. Water thoroughly after repotting and keep the plant in bright indirect light while it adjusts.
Common Pests and Diseases
Like most houseplants, alocasia polly can occasionally attract pests when stressed or in less-than-ideal conditions. According to Colorado State University Extension, washing plants periodically with water is particularly effective for controlling spider mites and aphids.
Spider Mites
Look for fine webbing between leaves and tiny dots moving on leaf undersides. Treat with insecticidal soap or neem oil, spraying thoroughly every 5-7 days until gone.
Mealybugs
These white, cottony pests cluster in leaf axils and along stems. Dab with rubbing alcohol on a cotton swab or spray with neem oil solution weekly.
Scale Insects
Brown or tan bumps stuck to stems and leaves indicate scale insects. Scrape off with your fingernail or a soft brush, then treat with horticultural oil.
Aphids
Tiny green, black, or brown insects cluster on new growth and leaf undersides. Rinse off with water or spray with insecticidal soap every few days.
Common Problems with Alocasia Polly
Here’s how to troubleshoot common issues you might encounter with your alocasia polly:
Yellow Leaves / Yellowing Leaves
Yellow leaves usually signal overwatering, which is the most common problem with these plants. Check your soil if it’s waterlogged, let it dry out more between waterings. Nutrient deficiency can also cause yellowing, especially older leaves.
Furthermore, natural aging causes older leaves to yellow and die, which is completely normal. If only one or two older leaves turn yellow while new growth looks healthy, don’t worry. Adjust your watering schedule and consider fertilizing if you haven’t fed your Alocasia Polly recently.
Brown Leaves / Brown Leaf Tips
Low humidity is the usual culprit behind brown leaf tips and edges on alocasia polly. Increase humidity around your plant using a humidifier or pebble tray. Water quality matters too chlorine and fluoride in tap water can cause browning.
Let tap water sit overnight before using, or switch to filtered water. Underwatering also produces brown, crispy edges, so check your soil moisture regularly. Similar to what many tropical plants like Elephant Ears experience, alocasia polly shows stress through leaf discoloration.
Drooping or Wilting Leaves
Droopy leaves indicate watering issues either too much or too little. Check the soil immediately to determine which problem you’re facing. If soil is bone dry, water thoroughly and your Alocasia Polly should perk up within hours.
If soil is soggy, you’ve overwatered and need to let it dry out significantly. Additionally, sudden temperature changes or cold drafts cause temporary drooping. Move your Alocasia Polly to a more stable location if environmental stress seems likely.
Leggy Growth / Sparse Foliage
Insufficient light causes alocasia polly to stretch toward light sources, producing thin stems and smaller leaves. Move your Alocasia Polly to a brighter spot with filtered sunlight immediately. Prune leggy stems to encourage bushier growth and redirect energy to healthy foliage.
FAQ
How do you care for an Alocasia Polly?
Provide bright indirect light and keep soil consistently moist but not waterlogged. Maintain temperatures between 65-80°F and humidity above 60% for optimal growth. Feed monthly during growing season with diluted liquid fertilizer, and watch for pests regularly.
How much sun does Alocasia Polly need?
Bright indirect sunlight works best about 6-8 hours daily from an east or north-facing window. Direct sun scorches leaves, while too little light causes leggy growth and smaller foliage. Place near a window with sheer curtains if direct sun is unavoidable.
Why is Alocasia so difficult?
These tropical plants demand specific humidity and moisture levels that most homes don’t naturally provide. Moreover, they’re sensitive to overwatering, underwatering, temperature fluctuations, and low humidity. If you’re looking for more forgiving tropical options, Snake Plant or Spider Plant might be better starting points. Once you dial in their preferred conditions, they’re actually quite rewarding and manageable.
How big will an Alocasia Polly get?
Indoor specimens typically reach 1-2 feet tall with a similar spread when mature. Leaf size depends on growing conditions optimal care produces larger, more impressive foliage. However, this compact variety stays much smaller than its elephant ear cousins, making it perfect for tabletops and shelves.
7 thoughts on “Alocasia Polly : Proven Care and Growing Guide”
Comments are closed.