In This Article
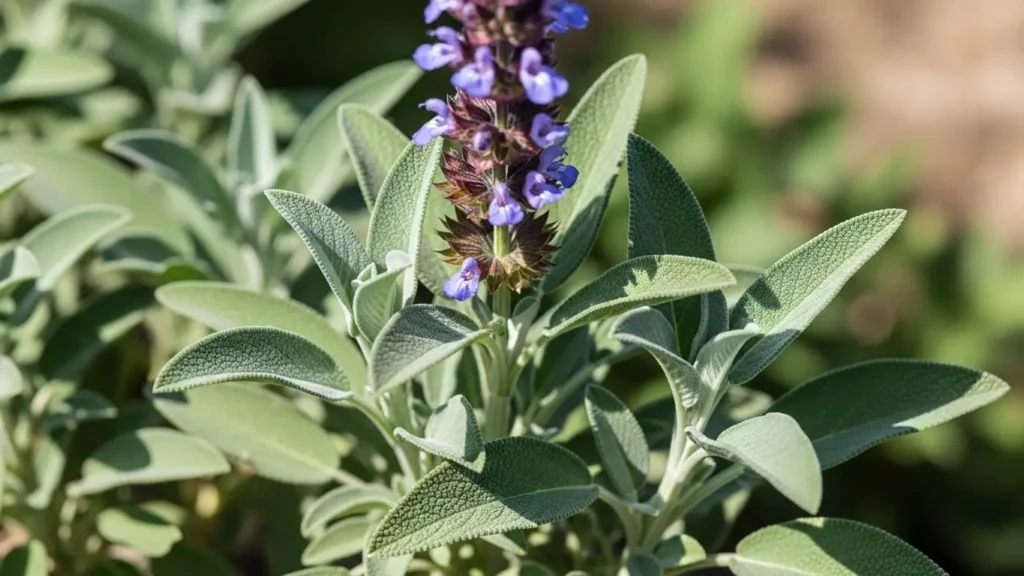
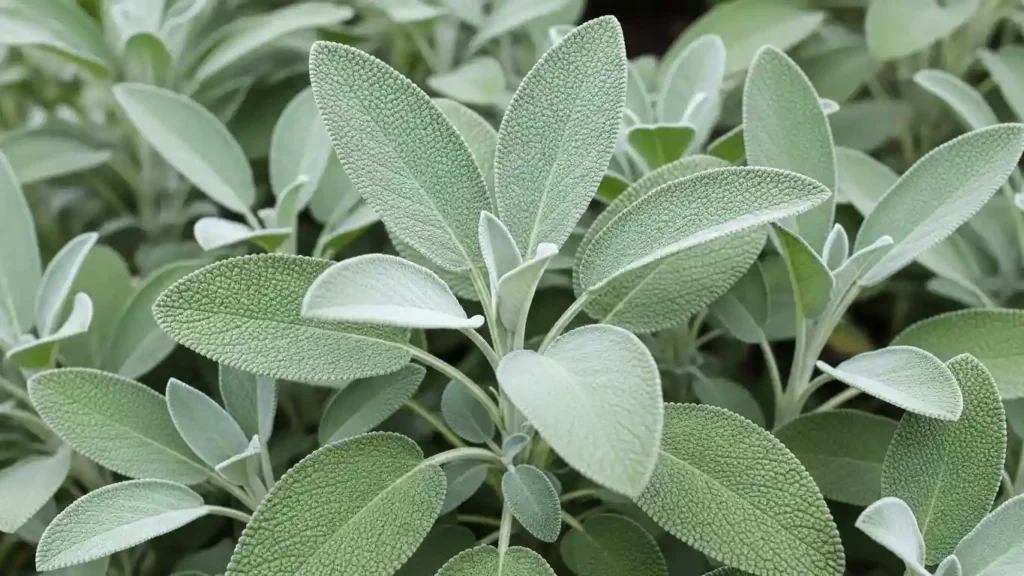
Sage identification starts with distinctive grayish-green, velvety leaves and square stems covered in fine hairs. Common sage (Salvia officinalis) displays wrinkled, oval foliage with pebbly texture and purple-blue flower spikes. This Mediterranean native thrives in USDA zones 4-10, featuring aromatic, slightly peppery fragrance intensifying when crushed.
| Characteristic | Details |
|---|---|
| Common Name | Common Sage, Garden Sage, Culinary Sage |
| Botanical Name | Salvia officinalis |
| Family | Lamiaceae (Mint family) |
| Plant Type | Perennial evergreen subshrub |
| Mature Size | 1-2.5 feet tall, 2-3 feet wide |
| Sun Exposure | Full sun |
| Soil Type | Sandy, loamy, well-draining |
| Soil pH | 6.0-7.0 (slightly acidic to neutral) |
| Hardiness Zones | 4-10 (USDA) |
| Native Area | Mediterranean region (Southern Europe, North Africa) |
| Bloom Time | Late spring to early summer |
| Toxicity | Non-toxic to humans; mildly toxic to pets in large quantities |
Types of Sage for Identification
Recognizing different sage varieties enhances your sage identification skills across diverse garden settings.
Common Sage (Salvia officinalis): The standard culinary variety features gray-green leaves, grows 18-24 inches tall, and produces lavender-blue flower spikes. This is the classic sage used for cooking with the strongest peppery-mint aroma.
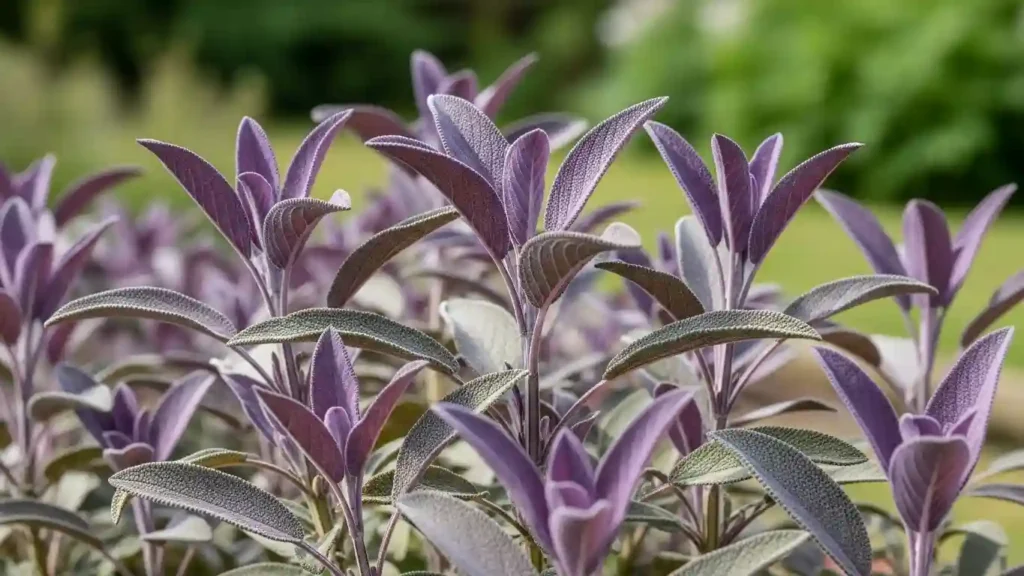
Purple Sage (Salvia officinalis ‘Purpurascens’): Distinguished by purple-tinged leaves when young that mature to grayish-purple, this variety grows 12-18 inches tall. The foliage has the same fuzzy texture but with dramatic color making sage identification easy.
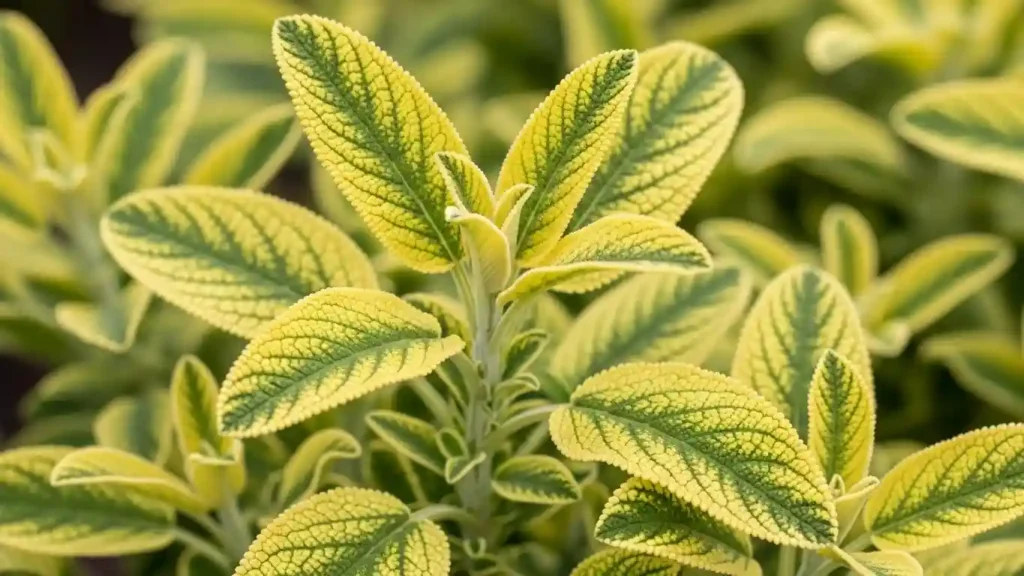
Golden Sage (Salvia officinalis ‘Aurea’): Features chartreuse-yellow leaves with green veining creating a variegated appearance. This compact variety reaches only 12 inches tall and makes sage identification simple with its distinctive coloring.
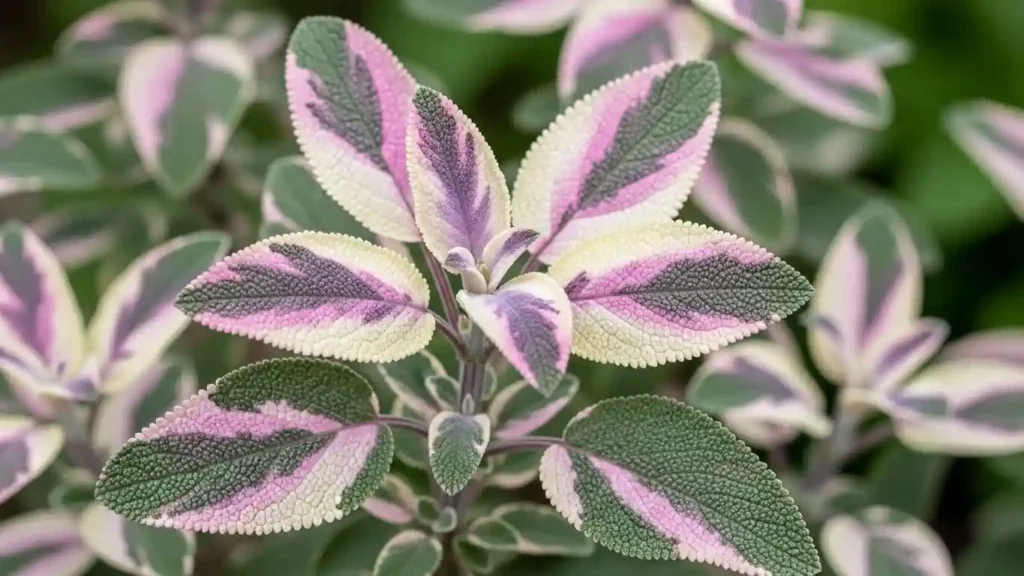
Tricolor Sage (Salvia officinalis ‘Tricolor’): Shows irregular cream, pink, and purple variegation on gray-green leaves. This ornamental variety grows 12-15 inches tall and offers one of the most visually striking options for sage identification practice.
Berggarten Sage (Salvia officinalis ‘Berggarten’): Recognized by extra-large, rounded leaves with a silvery-blue tint. This German variety rarely flowers but produces abundant foliage perfect for culinary use and easy sage identification.
Sage Care
Identifying sage is relatively straightforward once you know the distinguishing characteristics to look for. Here’s what you need to know about recognizing the visual features, growth habits, and aromatic properties that make sage identification accurate. With proper observation of leaf texture, stem shape, and scent, you’ll confidently identify this versatile herb in any garden or wild setting.
Light
For accurate sage identification in gardens, seek plants in full sun with 6-8 hours of daily direct sunlight. Insufficient light causes leggy growth and pale green leaves instead of characteristic gray-green coloring. Shaded plants produce fewer flowers and weaker aromatic oils, hindering scent-based identification. In wild settings, find sage on sunny hillsides, open meadows, or rocky slopes. South-facing or western garden beds provide ideal conditions, producing dense, compact foliage versus sparse shade-grown specimens.
Soil
Successful sage identification includes observing its natural habitat nearly always well-draining, sandy or loamy soil. Sage thrives in rocky, gravelly soils with excellent drainage, struggling in heavy clay or waterlogged conditions. Soil typically has moderate fertility with pH between 6.0-7.0. In gardens, find sage in raised beds or rock gardens with optimal drainage. According to the USDA Natural Resources Conservation Service, proper drainage prevents root diseases. Wild specimens grow on hillsides where water drains quickly, often alongside lavender or rosemary.
Water
Established sage plants are drought-tolerant, requiring water every 1-2 weeks during growth. Check soil moisture 2-3 inches deep water only when dry. Overwatering causes yellowing leaves and root rot, while underwatering creates wilting. Summer increases watering needs for containers. Mature plants often survive on rainfall alone.
Temperature and Humidity
Sage thrives in 60-70°F temperatures but tolerates 90°F heat and -20°F cold. These hardy perennials prefer low-to-moderate humidity like Mediterranean climates. In colder zones, mulching prevents frost damage. Southern sage remains evergreen year-round, while northern plants partially die back in winter, aiding identification across regions.
Fertilizer
When conducting sage identification in cultivated gardens, note that healthy plants rarely need heavy feeding. Apply a balanced, slow-release fertilizer (10-10-10) once in early spring when new growth emerges. Avoid over-fertilizing, as this produces lush foliage with diminished aromatic oils making scent-based sage identification less reliable. Organic compost applied annually provides sufficient nutrition for most sage plants.
Pruning
Regular pruning maintains sage’s compact shape, supporting accurate identification. Prune in early spring, cutting woody stems by one-third to one-half. Remove dead branches for air circulation. Harvest leaves regularly for bushy growth. Use sharp shears, cutting above leaf nodes. Deadhead spent blooms. Avoid late summer pruning before winter frost.
Propagating Sage for Identification Practice
The best time to propagate sage is late spring through early summer when plants are actively growing and easier to establish for future identification reference.
Propagating by Stem Cuttings
Stem cuttings provide the fastest method for propagating sage while maintaining exact characteristics essential for accurate sage identification.
Materials needed:
- Sharp, sterilized pruning shears
- Small pots (4-6 inches)
- Well-draining potting mix (50% perlite, 50% peat)
- Rooting hormone powder (optional but recommended)
- Clear plastic bag or humidity dome
Step 1: Select healthy, non-flowering stems from the current season’s growth, ideally 4-6 inches long with several sets of leaves. Cut just below a leaf node using clean, sharp shears to prevent disease transmission and ensure successful rooting.
Step 2: Remove leaves from the bottom half of each cutting, leaving 2-3 sets of leaves at the top. Dip the cut end in rooting hormone powder to encourage faster root development and improve success rates.
Step 3: Insert cuttings 2 inches deep into moistened potting mix, ensuring at least two leaf nodes are buried. Firm soil gently around the stem, then water thoroughly to eliminate air pockets around the cutting.
Step 4: Cover pots with a clear plastic bag or humidity dome to maintain high humidity levels. Place in bright, indirect light and keep soil consistently moist but not waterlogged. Roots typically develop within 4-6 weeks, after which you can transplant rooted cuttings into individual pots.
Propagating by Division
Division works well for established sage plants that have become woody or overgrown, creating multiple plants for sage identification practice.
Step 1: In early spring, carefully dig up the entire sage plant with a garden fork, lifting from all sides to preserve the root ball. Gently shake off excess soil to expose the root structure and identify natural divisions.
Step 2: Using a sharp knife or spade, divide the plant into 2-4 sections, ensuring each division has healthy roots and several stems. Make clean cuts through thick roots to minimize damage.
Step 3: Replant divisions immediately at the same depth they were growing previously, spacing them 18-24 inches apart. Water deeply after planting and maintain consistent moisture for 2-3 weeks while plants establish new roots.
Planting and Transplanting for Sage Identification Gardens
Plant sage in spring after the last frost date or in early fall 6-8 weeks before the first expected frost. Space plants 18-24 inches apart to allow for mature spread and proper air circulation. When planting, dig holes twice as wide as the root ball and just as deep to prevent crown rot.
Set plants at the same depth they were growing in their containers, backfill with native soil mixed with compost, and water thoroughly. For transplanting established specimens, divide overgrown plants every 3-4 years in spring to maintain vigor and compact growth. According to Oregon State University Extension Service, dividing perennial herbs regularly promotes healthier, more productive plants. This practice also provides additional specimens for practicing recognition skills and expanding your herb garden.
Common Pests and Diseases in Sage Identification
Like most garden plants, sage can occasionally face pest or disease issues that may affect its appearance and complicate sage identification.
Aphids
Look for clusters of tiny, soft-bodied insects on new growth and flower buds, causing distorted leaves and sticky honeydew. Treat with a strong spray of water, insecticidal soap, or introduce beneficial insects like ladybugs for natural control.
Spider Mites
Identify fine webbing on leaf undersides with tiny yellow or brown speckling on foliage, particularly during hot, dry weather. Treat by increasing humidity, spraying plants with water, or applying neem oil every 5-7 days until mites disappear completely.
Powdery Mildew
Notice white, powdery coating on leaves and stems, especially in humid conditions with poor air circulation. Treat by improving air flow, avoiding overhead watering, and applying organic fungicides like sulfur-based products or baking soda solution.
Root Rot
Recognize yellowing leaves, wilting despite moist soil, and blackened roots caused by overwatering or poor drainage. Prevent by ensuring excellent soil drainage, watering only when soil is dry, and avoiding waterlogged conditions that suffocate roots.
Common Problems in Sage Identification
Here’s how to troubleshoot common issues that may complicate accurate sage identification:
Poor or No Blooms
Your sage may not flower without 6-8 hours daily sunlight, causing foliage focus over blooms. Over-fertilizing with high-nitrogen products also promotes leafy growth instead of characteristic purple-blue flowers. Improper pruning timing removes developing buds. Ensure full sun, balanced fertilizers, and correct pruning for abundant blooms.
Yellow or Browning Leaves
Overwatering causes yellowing sage leaves, leading to root rot and nutrient problems. Poor drainage keeps roots constantly wet and oxygen-deprived. Allow soil to dry between waterings. Browning may indicate underwatering or salt buildup. Adjust watering schedules, improve drainage, and flush soil periodically to restore healthy gray-green foliage.
Wilting or Drooping
Sage wilts when roots cannot absorb enough water, usually from severe underwatering during hot weather or transplant shock after moving plants. Heat stress during extreme summer temperatures also causes temporary wilting even with adequate moisture. Water deeply during dry periods, provide afternoon shade in intense heat, and allow transplanted sage several weeks to establish new roots before expecting full recovery.
Leggy or Sparse Growth
Insufficient sunlight causes plants to stretch toward light, producing long, weak stems with widely spaced leaves instead of compact form. Over-fertilizing promotes excessive soft growth lacking typical sturdy structure. Move plants to full sun with 6-8 hours direct light, prune leggy stems for bushier growth, and reduce fertilizer. According to Clemson University’s Home & Garden Information Center, proper light maintains compact growth in Mediterranean herbs. For comparison, spider plants also become leggy in low light.
FAQ
How can I identify sage?
Sage identification relies on recognizing gray-green, fuzzy leaves with a pebbly texture growing on square stems. Crush a leaf between your fingers—true sage releases a distinctive peppery-mint aroma. Look for purple-blue flower spikes in summer and woody stems on mature plants for confirmation.
How do you identify wild sage?
Wild sage identification involves finding plants on sunny, well-drained hillsides with characteristic aromatic foliage. White sage (Salvia apiana) features larger, paler leaves with a rubbed, almost rubbery feel. Check for square stems and two-lipped flowers typical of the mint family for accurate wild sage identification.
What plant looks like sage but isn’t?
Russian sage (Perovskia atriplicifolia) resembles true sage with gray foliage and purple flowers, but belongs to a different genus entirely. Other sage look-alikes include lamb’s ear with similar fuzzy leaves, catnip with mintier scent, and hyssop with narrower foliage none are true Salvia species.
Can you burn any kind of sage?
While white sage (Salvia apiana) is traditionally used for sacred smudging ceremonies by Indigenous peoples, culinary sage can be burned for cleansing. However, respect Indigenous practices by avoiding cultural appropriation of ceremonial smudging. Consider sustainable alternatives like night blooming jasmine or ethically garden-grown sage instead.
1 thought on “Sage Identification: How to Recognize & Identify Sage Plants”
Comments are closed.