In This Article
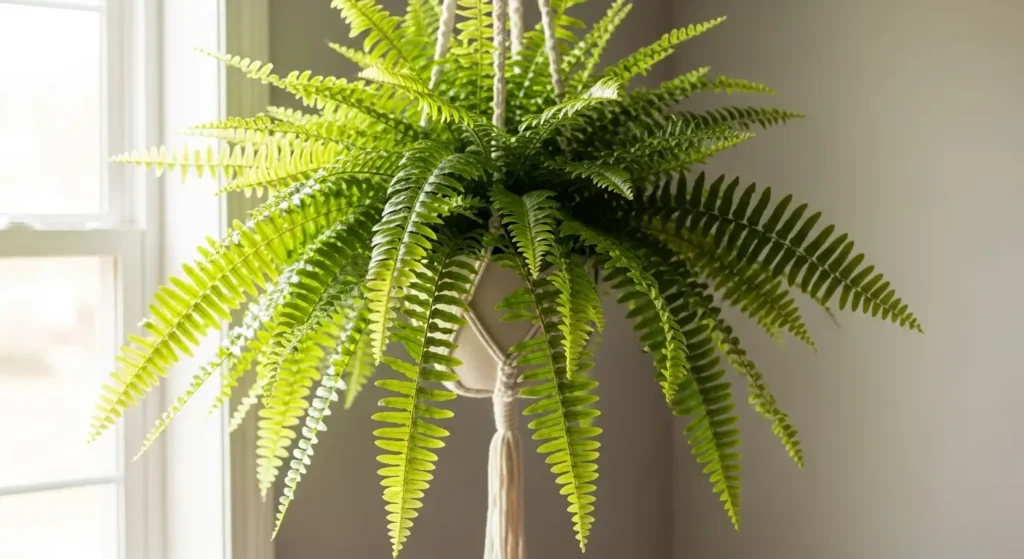
If you’ve ever admired the graceful, cascading fronds of a Boston fern, you’re not alone. These classic houseplants, scientifically known as Nephrolepis exaltata, have been adorning porches and living rooms since Victorian times. Native to tropical forests across South America, Central America, and Florida, Boston ferns bring a touch of woodland charm to any space. What’s great about these plants is that they’re actually more forgiving than their reputation suggests. Sure, they appreciate consistent care, but once you understand their basic needs, you’ll find them surprisingly easy to grow.
Boston Ferns Care Card
| Characteristic | Details |
|---|---|
| Common Name | Boston Fern, Sword Fern |
| Botanical Name | Nephrolepis exaltata |
| Family | Nephrolepidaceae |
| Plant Type | Perennial, tropical fern |
| Mature Size | 1-3 feet tall, 2-3 feet wide |
| Sun Exposure | Bright indirect light, partial shade |
| Soil Type | Well-draining, moisture-retentive potting mix |
| Soil pH | 5.0-5.5 (slightly acidic) |
| Hardiness Zones | 9-11 (USDA) |
| Native Area | Tropical Americas, Florida, West Indies |
| Toxicity | Non-toxic to cats, dogs, and humans |
Boston Ferns Care
Caring for Boston ferns is definitely easier than most people think. These beautiful plants thrive with just a few basics: consistent moisture, high humidity, and bright indirect light. In the following sections, we’ll walk through everything you need to know to keep your fern looking lush and gorgeous year-round.
Light
Boston ferns prefer bright, indirect light for optimal growth. Think of the dappled sunlight filtering through tree canopies in their native tropical forests. Indoors, place your fern near an east or north-facing window where it gets plenty of light without direct sun exposure.
Too much direct sunlight will scorch those delicate fronds, turning them pale yellow or crispy brown. On the flip side, insufficient light leads to sparse, leggy growth with smaller fronds. If your bathroom has a window, that’s actually an ideal spot since it naturally provides both humidity and filtered light.
Soil
The right soil mix makes all the difference for Boston ferns. These plants need a light, well-draining potting mix that retains moisture without becoming waterlogged. A quality peat-based mix works perfectly. You can also create your own blend using equal parts peat moss, perlite, and compost (1:1:1 ratio).
According to the University of Florida IFAS Extension, proper drainage is absolutely critical for preventing root rot while maintaining the consistent moisture ferns love. The organic matter in the mix helps retain water while perlite keeps air flowing through the roots.
Water
Here’s the thing: Boston ferns like their soil consistently moist but never soggy. Water when the top 1-2 inches of soil feel slightly dry to the touch. During spring and summer, this might mean watering every 3-5 days, while in fall and winter, weekly watering often suffices.
Additionally, the worst thing you can do is let the soil dry out completely, as this causes fronds to brown and drop. However, sitting in waterlogged soil is equally problematic and can lead to root rot. Similar watering habits work well for spider plants, another humidity-loving houseplant that appreciates consistent moisture. Use room-temperature water and aim for the soil rather than wetting the fronds to prevent fungal issues.
Temperature and Humidity
Boston ferns thrive in temperatures between 60-75°F, which makes them perfect for most homes. They’re not fussy about temperature as long as you avoid extremes. Nevertheless, humidity is where these plants really show their tropical roots—they prefer 50-80% humidity levels.
Honestly, low humidity is the number one reason ferns develop brown, crispy tips. Boost moisture around your plant by misting daily, placing it on a pebble tray filled with water, or using a humidifier. The American Fern Society recommends maintaining consistent humidity levels for optimal frond development. Keep your fern away from heating vents, air conditioners, and cold drafts that can stress the plant.
Fertilizer
Feed your Boston ferns with a balanced liquid fertilizer diluted to half strength. During the growing season (spring and summer), fertilize every 4-6 weeks. In fall and winter, reduce feeding or stop entirely as growth naturally slows down. Over-fertilizing can cause salt buildup in the soil, leading to brown leaf tips and stunted growth.
Types of Boston Ferns
While the classic Boston fern is stunning on its own, several beautiful varieties offer unique characteristics:
- ‘Bostoniensis’: The original and most common variety with gracefully arching, sword-shaped fronds reaching up to 3 feet long. This cultivar features the classic upright-spreading habit that made Boston ferns famous.
- ‘Fluffy Ruffles’: Compact variety perfect for smaller spaces with tightly ruffled, dark green fronds that create a dense, fluffy appearance. It typically stays under 12 inches tall, making it ideal for tabletops.
- ‘Dallas’: More tolerant of lower humidity than other varieties, with slightly coarser-textured fronds and a more upright growth habit. This is your go-to choice if you struggle with dry indoor air.
- ‘Rita’s Gold’: Features stunning chartreuse-gold colored fronds that brighten up shady corners. It maintains the same growth habit as the classic Boston fern but adds a unique color element.
Propagating
The best time to propagate Boston ferns is during spring and summer when plants are actively growing. Propagation is actually quite straightforward with these ferns.
Propagating by Division
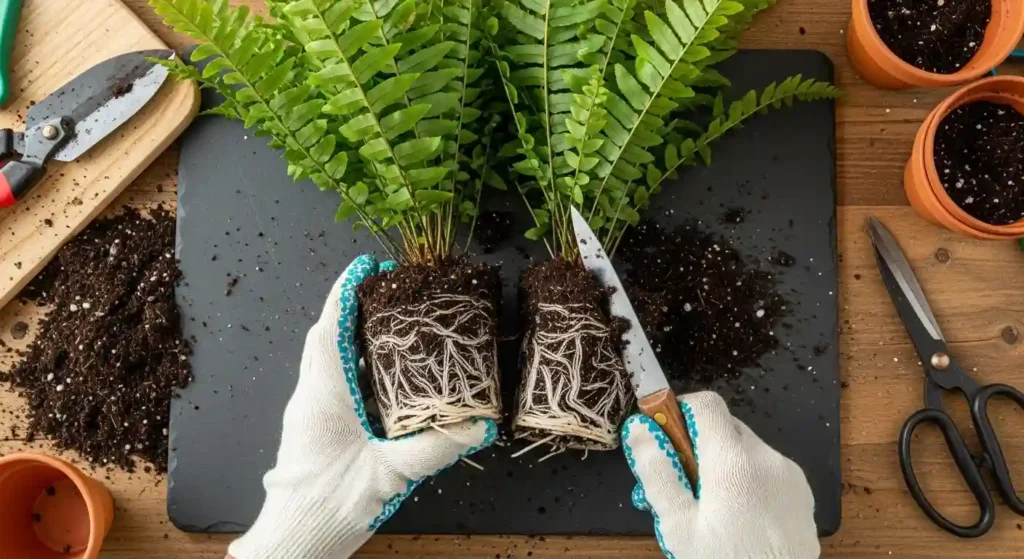
Division is the easiest and most reliable method for multiplying your Boston ferns. This technique works perfectly in early spring during repotting time.
Materials needed:
- Sharp, clean knife or scissors
- Fresh potting mix
- Appropriately sized pots with drainage holes
- Water
Step-by-step instructions:
Step 1: Remove your fern from its pot and gently shake off excess soil to expose the root system. You should see natural divisions or clumps where the plant can be separated.
Step 2: Using your clean knife, carefully separate the root ball into 2-3 sections, ensuring each division has both healthy roots and several fronds attached. Each section should be substantial enough to survive on its own.
Step 3: Plant each division in fresh, well-draining potting mix at the same depth it was growing previously. Don’t bury the crown (where fronds emerge from roots) too deeply.
Step 4: Water thoroughly until water drains from the bottom, then place in bright, indirect light. Maintain high humidity while divisions establish over the next 2-4 weeks.
Propagating by Runners
Boston ferns naturally produce runners (stolons) that can develop into new plants. Identify healthy runners extending from the parent plant and pin them to moist soil in a separate pot while still attached. Once roots develop in 4-6 weeks, cut the runner from the parent. This method is similar to how you’d propagate wandering jew plants, which also produce runners readily.
Potting and Repotting Boston Ferns
Boston ferns benefit from repotting every 1-2 years or when you notice roots growing through drainage holes or circling the pot’s interior. Spring is the best time for this task. According to NC State Extension, repotting encourages vigorous growth and prevents the plant from becoming root-bound.
When to Repot
Look for these signs: roots visible at the soil surface or drainage holes, water running straight through without absorbing, or significantly slowed growth despite proper care. These all indicate your fern has outgrown its current home.
How to Repot
Choose a pot 1-2 inches larger in diameter than the current one, always with drainage holes. Gently remove the fern, loosen compacted roots, and trim any dead or damaged ones. Place fresh potting mix in the new container, position the fern at the same depth, fill around it, and water thoroughly.
Common Pests and Diseases
Like most houseplants, Boston ferns can occasionally attract pests, but they’re generally easy to manage with quick action.
Spider Mites
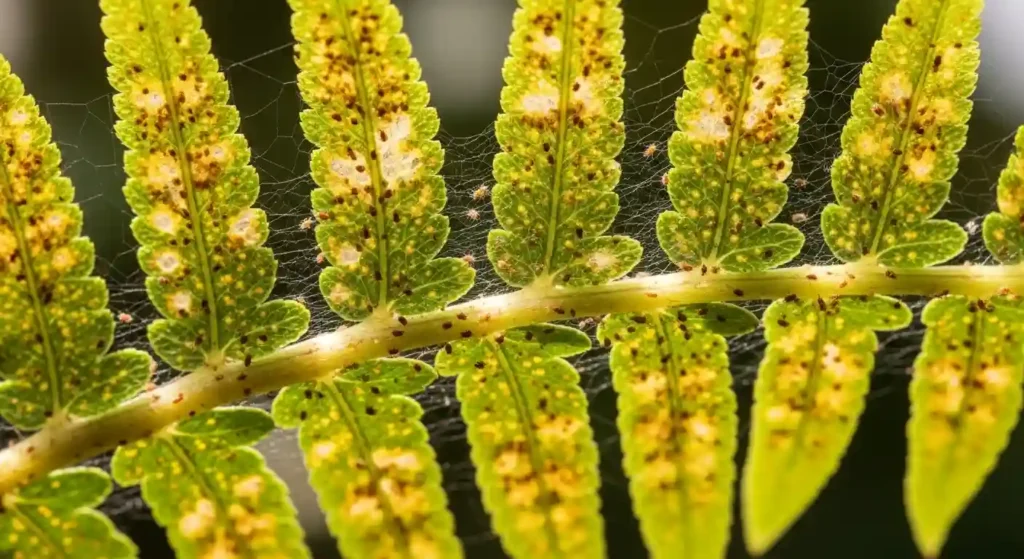
Look for fine webbing between fronds and tiny moving dots on leaf undersides, plus stippled yellow spots on foliage. Treat with neem oil spray or a strong shower of water, then increase humidity since spider mites thrive in dry conditions.
Mealybugs
These appear as white, cottony masses on fronds and stems, sucking plant sap and causing yellowing. Remove with cotton swabs dipped in rubbing alcohol or spray with insecticidal soap weekly until eliminated.
Scale Insects
Brown or tan bumps attached to fronds and stems are scale insects that can weaken your fern significantly over time. Scrape them off manually or treat with horticultural oil, checking weekly for several weeks to catch any newly hatched insects.
Common Problems with Boston Ferns
Here’s how to troubleshoot common issues you might encounter with your Boston ferns:
Yellow Leaves
Yellow leaves are probably the most common complaint with Boston ferns and can have several causes. Overwatering is often the culprit, especially if the soil stays soggy—check that your pot drains well and reduce watering frequency. Nutrient deficiency from lack of fertilization during growing season also causes yellowing, so resume regular feeding. Finally, some natural aging of older fronds is completely normal, so simply trim them off. If you’re seeing similar issues, check out care tips for peperomia plants, which also develop yellow leaves from overwatering.
Brown Leaves
Brown leaf tips and edges usually point to low humidity, the most frequent issue with indoor Boston ferns—increase misting or add a humidifier nearby. Water quality matters too, as fluoride and chlorine in tap water cause tip burn, so try using filtered or distilled water instead. Underwatering that allows soil to completely dry out will also brown fronds, so maintain more consistent moisture levels.
Drooping or Wilting Leaves
Drooping fronds signal watering issues, but which kind depends on the soil condition. Check the soil first—if it’s bone dry, your fern needs water immediately and should perk up within hours. If it’s soggy, you’ve overwatered and need to let it dry out some. For persistent wilting despite correct watering, similar to issues seen with lipstick plants, check for root rot and consider repotting in fresh soil.
FAQ
Do Boston ferns like sun or shade?
Boston ferns prefer bright indirect light or partial shade rather than full sun or deep shade. Direct sunlight scorches their delicate fronds, while too much shade causes sparse growth, so aim for filtered light.
What are the disadvantages of the Boston fern?
Boston ferns require consistent moisture and high humidity, making them more demanding than some houseplants. They also shed frequently and need regular maintenance like removing dead fronds, plus they grow quite large.
Does a Boston fern come back every year?
Yes, Boston ferns are perennial plants that return year after year with proper care. In zones 9-11 they’re evergreen outdoors, while in colder areas they can be overwintered indoors and returned outside in spring.
Where is the best place to keep a Boston fern?
The ideal location is a bathroom with a window, providing natural humidity and filtered light. Alternatively, any bright spot away from direct sun with added humidity from misting or a humidifier works perfectly well. For more humidity-loving plants, consider exploring pothos care for similar growing conditions.
2 thoughts on “How to Grow and Care for Boston Ferns : Complete Guide”
Comments are closed.